Friday, March 9, 2012

Rainy Day Encouragement

"No matter how long the winter, spring is sure to follow." 


We've had a few beautiful days this week, and it's suddenly returned to some pretty nasty rain... but Spring will come! Maybe next week?

Saturday, September 10, 2011

Yay for scarves!

I am the Scarf Queen. Seriously, I love them. I love to wear them, but I love to look at them even more. You can never have too many.

I bought this Jones New York scarf at TJ Maxx when I was visiting my cousins in Ohio. It was super cheap, and I liked the fabric, the size and the very swan-white plainness of it. BUT, then I never wore it.

So I got this urge to try textile paint today. I've thought about painting rugs, but never painting scarves--and I remembered! (It was fate)... that I have this beautiful white scarf that I never wear because it doesn't add a darn thing to any outfit. So I thought, I love stripes, and I love this scarf...but stripes could make it so much better! So I did just that.


This is the paint I used. It is wonderful, and I can't wait to try it out on more things. I purchased it from the University of Washington Bookstore which has everything art related you could ever want. I think it is actually listed as "the best college bookstore" in the country. Buuuut, if you're not in Washington, I'm sure they sell it at Michael's, JoAnn's, or Hobby Lobby as well.

I used regular painter's tape, measured and taped off some stripes .. then got to painting.


I feel like I should give more detail, but it really was so easy! I started with 5 stripes.


Then I decided seven was a better number.. or I was just giddy to use more textile paint. 

Then, I waited patiently while it dried--an hour maybe?

And when I started to peel off the tape!! Holy Moses! 
It's so easy! 
and I so love it!!


 After you're done, simply iron the opposite site for 30 seconds to set.

Oh Oh Oh it's magic! You knowwwww..


Please excuse the bam bam hair. When your hair is longer than a Harley Rider's (no offense to any motorcycle mommas), it must be wrangled in an off-the-neck fashion.

Also excuse the messy bedroom and exposed box spring.

I love the assemetry of it when it's tied. This may be the easiest, most wonderful project to date!

Do you love it too?!?!

La Chair Feminina

Normally I like my chairs pretty masculine, see below.


LOVE this look.


But, I found 2 chairs awhile back on craigslist and thought they would be a fun project...

(I owe you a before picture here)


They sat in my closet for.... 9 months? a year? And again, Josh is out of town, and I'm bored so I'm finishing projects. Also, I could really use the closet space that these suckers were taking up.

After I brought them home I couldn't help but see the Scream face in the chair back, and it really turned me off to ever wanting to do anything creative with this set. I mean, how could you not see it?


seriously? It's like it was intentional..
Also, the front left leg is unfinished (gasp!). I ran out of paint and don't have a car, and it was getting dark, etc. etc. But I will finish.

Well, I was just going to re-list them on craigslist, but I decided that I might as well try to better them--and well, if that didn't work I could always still sell them.

So I painted them (I'm on a white kick, have you noticed?). And re-upholstered the seat with this amazing yellow linen that I was really scared to use (simply because I love it so much!). I originally wanted to stain them, but the lacquer-ish stuff was so thick that the sanding seemed simply daunting.


What do you think? I need to do the second chair, and I may make a little sitting area...but I'm worried that the femininity these chairs have brought to the room may be a bit much. We'll see.

Friday, September 9, 2011

Good Riddance, green monster!

I have been waiting, and waiting and waiting and waiting to do something with this:


Ahhh!!!! It's like a dirty green monster. With big white eyes and crooked teeth.

My original idea was to paint it, put some industrial wheels on the bottom, a towel bar on the side, repair the cabinet,  and add a butcher block as the top so I could use it in my kitchen (hmmm that sounds like it was a really good idea. next time!).  
Alas, I couldn't part with my current kitchen set-up.

Instead, I decided to make it into a "media console"-ish thing so I could get rid of the other piece of furniture in my family room that I didn't like. I had been using a really blah bookshelf to house the record player, records and stereo...

Anyway, here's what I did:

First, I painted the drawers.


And then the drawers sat.. painted, ready to go, right next to the big green cabinet that I kept putting off sanding. 

Then, Josh went on vacation and I found myself moderately bored and simultaneously motivated to finish up all of my projects.

So, off to Lowe's I went.

Again, I bought some trim (see last post). I came home, sanded and painted the "console" then got to staining my trim pieces..which I sawed and sanded in my family room (the joys of apartment living).

I stained them in my kitchen... on the white-with-gold-speckles counter tops.

..while I ate leftover brunch from Skillet Diner. yum! 


It's a good thing we eat a lot of pizza because I use the boxes for all of my projects.


I like to stain things very dark and rustic-y. I put a small trim piece on each side of the main opening. Oh yeah! I decided to do away with the doors. These small trim pieces were only put there to hide the damage that was done to the wood by those nasty doors. My brother says they look weird and that I should have run the trim up the entire side..


Then I stained two longer pieces, and fit them to the top and bottom edges of the opening. It was really simple, and definitely made this project a lot better than just a new paint job. Oh! I also bought that basket for our records.


As soon as the knobs I want from Anthropologie go on sale, I'll get those on as well..


What do you think?

I'm pretty proud of this one--but I'm not sure if that's due to getting rid of the old shelf, finally doing something with this one, adding trim to furniture for the first time, or simply being proud of the project itself. But for the time being, I love it!

Displaying Photos

As you can see from my last post, I really enjoy taking (and take a lot of) pictures. Now that I've been mostly taking film, I'm actually printing all of my rolls as opposed to keeping them all stacked up and hidden on my hard drive.

I've always wanted a way to display the photos I've taken, and there are tons if ideas online:


I love all 3 of the previous displays, but I wanted something that looked a little more organized, but still very casual.

I like the display below, but I big part of being able to display my favorite pictures is being able to change them out quickly and easily. I know if I had them this neat and orderly that I would never go back and change out old pictures for new ones. Yes, I am that lazy, and most likely I would move on to another project and never look back. If there is one thing I concentrate on doing for myself, it is making things easy.


So I came up with this idea to buy some trim from Lowe's, and make almost flush shelves to lean the photos on... I kept trying to explain this to everyone but nobody could understand just exactly what was going on in my head. Anyway, here is what I ended up with. This project cost about $14. Each piece of trim was ~$7, and I already had the spray paint. 


These two shelves are one piece of trim. I bought two pieces to make four, 48in. shelves.

My thoughts:

I could have gone with a funky color, or stained the wood, but I really wanted the shelves to simply be the medium that held the pictures--not a distraction.

I'm planning to add at least one more shelf above these ones, but just haven't gotten around to it yet! I'll have to find a new place for that little framed picture too.

 I like that I can display different sizes without messing up the "unity" of the pictures. I think the horizontal shelf unifies them enough to throw up some different styles/sizes.

What do you think?

Wednesday, May 4, 2011

Film

Hi everyone!

You may have seen this post on Forty Twenty Four a few weeks ago, but I thought I'd throw it up here anyway! Enjoy! And don't forget to still check out Micah and Catherine's blog, Forty Twenty Four--it's great!
____________________________________
Photography has always been fun for me--I've never aimed to have the best pictures, or start my own business--as great as I think that would be, it's also been really great to have fun with a hobby that I don't have to hold up to any sort of standard.

I started out with film (was there another option?) cameras. I've always loved to take pictures.. or I guess, I've always loved being able to have hundreds of people/memories/moments frozen in time at my disposal (but not in the creepy way that sounded). It wasn't until late in my college career that I bought my first digital SLR camera and actually became interested in photography.

I think shooting manually with a digital camera was the best possible way to learn about manual photography. You can adjust the aperture/shutter speed/zoom, take a picture, and get immediate feedback. Then adjust some more, and get more immediate feedback. You're able to see the results as you're making small changes, which is (in my opinion) the best way to learn how to achieve exactly what you want.

..And while I said I'm glad it's just a hobby, you can only take so many pictures that you're not going to do anything with before you start itching to try something new. But first, here are a few of my favorite digital shots:


Recently, I started shooting with film again-- and now that I know what I'm doing with a manual camera, I really enjoy the freedom of film! I've been really into Lomography lately, and I almost guarantee that if you like to take pictures, you'll love the world 'o lomo too.

First, Lomography is a type of analogue film photography. You may have heard of the Diana cameras (sold at Urban Outfitters) or Holga cameras. These are lomography cameras and produce very vibrant colors with deep saturation/vignetting/light leaks--things that make each picture nearly impossible to replicate. It's a very experimental, creative, imperfect type of photography that has people all over the world excited about film again-- and it's cheap! You can buy a Holga for about $50, and if you buy the model that takes 35mm film (as opposed to 120mm film) then film and developing is completely reasonable, too! I've been shooting with a Holga for about 3 months now.

There are a few things you should know before I share some of my pictures.

1. The shutter on my camera does not flip shut milliseconds after I open it--It opens when I press the shutter button down, and does not close until I let the button back up. This gives you a lot of exposure options, but it also means that if you're not taking pictures in sunny weather, you have to be very still in order to keep things in focus while you're holding the shutter open long enough to let light in.

2. There is no zoom or flash. A camera flash basically blasts enough light to expose the film very quickly, essentially freezing the subject (and making us all look unrealistically pale). But without a flash the shutter needs to be held open long enough to expose the film properly (a millisecond in bright sun, 30 seconds for a city street, several minutes on a dark night). All of the pictures taken below were taken without a flash.

3. The film doesn't advance itself...duh, right? Trust me, I'm not being condescending. When I first got my Holga I remember thinking "Oh! Gotta advance the film, gotta advance the film!" like I was still programmed after all of these years to keep that in the front of my mind. Did you know that if you don't advance the film, you can take two pictures in one? Or if you advance it only half way you can take two different pictures side by side? I had thrown this logic to the back of my brain and completely forgotten that I could essentially break the rules and come up with something awesome! There are a few double exposure shots below...

4. There are 3 aperture settings: "up close", "group picture", or "mountain range". If you want the primary focus close up, use the "up close" setting. If you want the primary focus further away, choose the "mountain range" setting. Easy peasy!

All of these things make these cameras insanely simple--but at the same time, you have to have some control over every aspect of the shot. You can't just press the button and let the super fast camera spit out a beautiful picture for you. Therefore, you've gotta keep working... keep adjusting, develop your film differently, use expired film, film that doesn't fit (and see the sprockets like this picture), break all of the rules and see what happens!

It was a rough start, but I'll take you through a few of my photos:

I was a little discouraged at first! My whole first role was really fuzzy--it doesn't take long to learn how helpful a flash or tripod can be! But aren't the colors great?

This picture is a double exposure--I took a picture of the mannequin you can see to the left, and without advancing the film I took another of a street in Pioneer Square. I love taking multiple exposures but I don't think I took this one on purpose :)
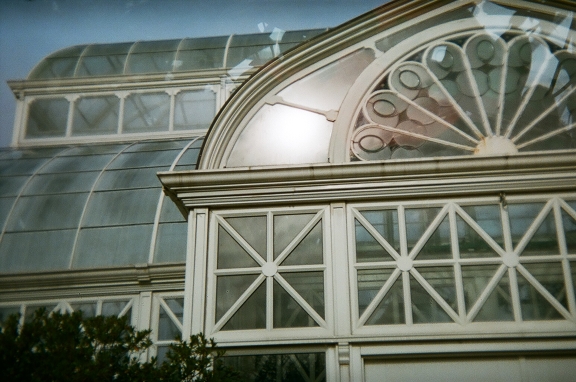
I love the color and movement in this one.


This is a long exposure picture--it was taken at night, without a flash, so the shutter was open for about a minute. If you look closely at the viaduct across the background you can see the streaked headlights.

This is another double exposure--The first picture I took was of the big black donut sculpture, then, when I took the second photo everything else was over-exposed and what had been the sculpture was just right.

A double exposure of Josh, and a lampshade. I really didn't think this would come out as anything but a lampshade, but I'm glad it did!


My friend Diane.
I've only taken about 200 pictures with this camera, and every time I develop a roll I am surprised.

If you have kids, I think this would be a great opportunity to introduce them to photography. They can learn about different types of film and processing, and there's no need to hand over the family's expensive digital camera. Can you imagine their faces when they finally get to pick up their film and see their pictures? And who knows what kind of perspective they'll capture!

Finally, if you're still reading, I hope I haven't bored you to death. I really wanted the opportunity to share a bit about Lomography with you, and I'm hoping it's not all old hat!

If you're interested, and want to learn more about lomography cameras, techniques, or the community of lomographers you can check out more here:

http://www.lomography.com

If you're in the Seattle area, there is a group of us that get together once a month to share recent photographs, cameras, ideas, etc. It's a ton of fun--Catherine can send you my email address if you'd like more information.